Let me guess; right now, you have already made a plan or planning to go to the land of the free, the United States of America. Fret not, even you haven’t come up with a plan yet, you are still eligible to apply for a visa. Securing your visa is the very first step towards your journey to the land of the free. Once you have secured your visa, you have 10 years, yup you read that right; 10 years validity of the visa (multiple entries and up to 6 months per entry). Not 10 years per visit ya; remember, overstaying may results in severe punishment by the US Immigration. Whoa, that was a little too fast, I don’t mean to intimidate you anyway, just penning the law.
You may have read others experience on how they obtained the visa and the daunting steps of getting through process. It’s indeed a little bit tricky if this is your first time trying to obtain the visa; worry not, I’ve made the steps simpler so you get the clear idea what to do and what to expect throughout the process of obtaining US Visa.
The process of obtaining the tourist visa or formally known as B1/B2 visa goes as follows:
- Pay your visa fees.
Print your slip. (it’s really important, I repeat, it’s important) to keep the slip number, (you will need the number to schedule the appointment which will be explained further later). The slip can be obtained from here: http://www.ustraveldocs.com/my/my-niv-paymentinfo.asp . I used JomPay to pay for my visa fees, there’s no service charge and it’s convenient as it’s integrated with my Maybank2U account. JomPay is available with most well-known bank in Malaysia. The slip will look like this:
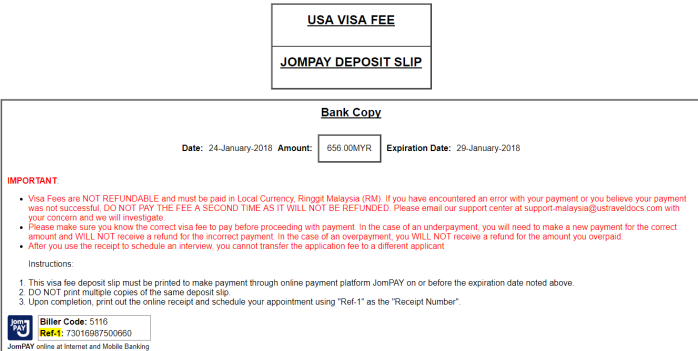
I highlighted the Ref-1 number at the bottom left. That’s the number that you must keep. Capture it with your phone camera, write it down and print it out, just in case you lost it. If you are not into online banking, there’s other options you can use including paying by cash at any Ambank branches counter nationwide.
2. Get your photo (hard copy and soft copy) ready.
US Immigration is a bit particular when it comes to the photo you use to apply for the visa; in fact, there’s a clear guidelines and specific photo requirement that can be used for the visa application. Below is what all the points are about:

I would recommend you to get a professional photo studio service. I got mine for only RM 19.
3. Fill up the form
Once you have paid the fee, got your photo taken, now it comes to the most interesting part; filling up the forms called DS 160 form. The immigration will use the info you provided on the form to process your visa, so make sure you fill up every information as accurate as possible. Avoid putting “unknown” or ‘N/A” or “not valid” on the form as it may shows that you do not have clear travel intentions and could effect your visa issuance.
Here’s the CLEAR guidelines which I referred to when I filled up my application taken from US Embassy Jamaica: https://photos.state.gov/libraries/jamaica/231771/PDFs/DS-160%20Instructions.pdf .
The pdf document explain to you step by step on how to fill up the form and what to expect. As I have mentioned earlier, avoid putting “unknown” or ‘N/A” or “not valid”.
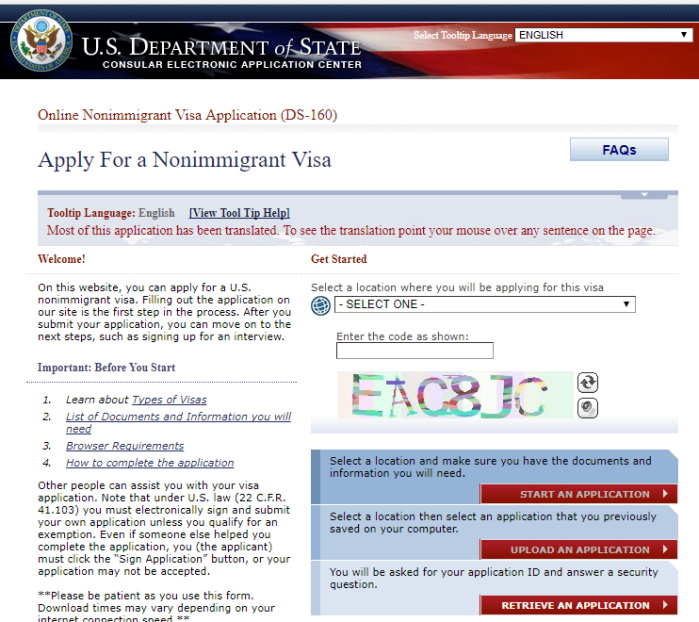
Here’s the screenshot of the main page of the form:
4. Schedule your appointment
Once you have done filling up the DS 160 form, print the confirmation page and proceed to schedule your appointment at the US Embassy. It can be done here: https://cgifederal.secure.force.com/?language=English&country=Malaysia. You would need to register your email and proceed to schedule your appointment. The earliest date you might choose is at least 10 – 12 days from the day you submitted your application. The date format used in the website is MM-DD-YYYY. So be alert and don’t fill up the wrong date, as any contradictory information will result in rejection.
The appointment confirmation will look like this after you print it out:

5. Go to the embassy for an interview.
US Embassy KL is located at Jalan Tun Razak. If you are going by public transport, take the LRT KJ line and disembark at Ampang Park station. From there, you can walk to the embassy. Try to arrive at least 30 mins before your scheduled interview time. Expect long lines.
Once you have done all the formalities before being granted into the embassy building and meet the US consular, get ready to be interviewed.
There’s few questions will be asked to you. Answer it accordingly.
In my case, I was asked these questions.
- Why are you going to the United States?
- For how long?
- Where in the US are you going?
- Anyone else going with you?
- What do you work as?
- Where did you study?
- Which year you graduated?
- Have you been to any other countries?
- How long you been to those countries?
- Do you have any friends/family in the US?
My brain went into full throttle. Luckily, I managed to answer all questions promptly and the consular said: Your Visa is approved.
I left the embassy happily knowing that I have 10 years from that date to go to the US and every single money, energy, time spent was worth it!
I hope this will help you in getting through the whole process! Leave me a comment or two if you would like to clarify anything ya.
